Monday, January 9, 2012

| How to make your own patch cord? |


Assalammualaikum...
Rsa mcm dlm entry kali neh nk ckp melayu pulakk...haha...dh penat ckp omputeh..and plus bukn ada omputeh yg bac pon kn....kiki..
*Tp title entry tetap nk omputeh kn...ok abaikan..
Last week , dlm kelas disbb kn kena setup new sever from the crash..so kena lah wt patch cord sendri..walapon belambak jual kt kedai..hehe

Ohh sebelum tu..ni kali ke2 wt patch code..tp rsa cm 1st time..kiki..sbb lupa terus..


So apa itu patch cord ???
Yang pasti patch code bukn lah sejenis alien mahupun kuih..tp patch cord tu bentuk dia seperti gmbr dibwh ini..Serius sy xtipu sbb Google display mcm neh..hehe

Beberapa bahan utama diperlukan untuk buat patch cord neh. Let's go one by one ok..
1. Patch cord wire
2. Small Cutter
3. RJ 45

4. Crimping tools

5. LAN Cable tester


Rsa ny itu sj bahan2 yg diperlukan untuk wt patch cord yg sempurna..TAPI apa yg lebih penting  cara nk masuk kn patch cord tu..mesti ikot colour yg betol..kl x mmg FAIL la patch cord tu..means that patch cord tu dh xleh guna n kena buat semula...

Step 1. Loose up semua wire into single wire since mostly wire jenis twisted.
Step 2: Then susun ikot colour yg telah ditetapkn..Boleh rujuk gmbr dibwh.
Step 3: Ambk cutter then potong wire2 yg kecil tu into one single line..means that bg sma la..bru senang nk msukkan dlm RJ 45 tu..


Step 4: Masukkan wire2 yg telah disusn dgn cemerlang tu ke dlm RJ45, dan pastikan hujung wire menyentuh kepala RJ45 tu ok..
Step 5: Setelah mendapat keyakinan, then bru ambk crimping tools utk crimp kn RJ45.
Step 6: MAsukkan kedua2 patch cord yg telah siap td, ke dlm LAN cable tester.
Step 7:   The result either PASS or FAIL..Hehehe..

" SELAMAT MENCUBA SEMUA"


P/S: Mcm share resepi mskn pulak..hehe...

Thursday, January 5, 2012

| How cartoon related to the nets ?|

Assalammualikum..
There are many things i have learn so far about network security BUT  there are even million thing that i need to learn MORE before going to practical training early February neh...OMG, i just need a place with allowance since msa dip dlu practical xda elaun ponn..nk jugk la merasa practical ada elaun knn....hhehe i'm not demanding ckup la kl rm1K sebulan..hahaha...*ok dh berangan pulak..


Let's back to reality...dlm entry kali neh..i just wanna to share about how cartoon can make fun about network..First time searching on this thing and i find it so interesting + cool + fun..hehe..
Time to put  your stress behind and just feel the joke..=)


Sunday, December 18, 2011

| How to check Acronis being installed in the computer?

Assalammualikum..

Last two week, in class i had learn about Acronis..That was i my first time ever heard about Acronis.. In upcoming entry i will explain on how Acronis works and its function to the computer security. But for now i just explaining on how to check after Acronis being installed in the computer.

After create the secured zone or in other words install Acronis in the computer, u might be question where to check
Acronis take placed in the computer??? Since we cannnot see it through ' My Computer' although it is a sub partition of
local disk but we still have a solution to check it.

Belows are the simple steps that we can do in order to check where Acronis placed in the computer.
First,direct go to the Control Panel and switch your Control Penel view to 'Classic View.
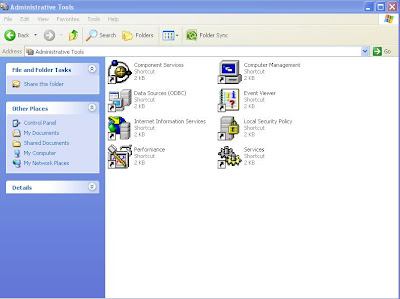
Then,click at Adminstrative Tools and double click at  Computer Management and wait for a while.
Next,look at disk management which is sub menu under Storage.
Then u can see the disk management partition where Acronis take placed.
Your secured zone were take placed at the selected local disk that u choose during secured zone creation process.


 OK, thats all for now..another new knowledge for me and for u as well..!
To be continue with more updates...=)

| How to make file sharing

Last week, i had learned on how to make file sharing and i
really eager to share my new knowledge with everyone..
Hope for those that already familiar with the steps can correct me
if I' m wrong in explaining the steps..
Many thanks in advanced everyone...!!! hehe..=)

ohhh, before that..i think file/ folder sharing is simple for
everybody to do especially for the beginner like me...

There are several Objectives why we do file/ folder sharing and
one of it is to create ease of use for us in sharing any materials
with others within similar network. File sharing can only be done
after we know ip address of person to be shared.

How to know or pc ip address???
Go to Start and look for Run... then press Enter..
then u might see the black command windows will appeared.
Next type ipconfig then press Enter once again..
then u can take a look at your LAN (Local Area Network) connection .
Below is the screen shot of the command box
together with the PC ip address.
Below shows an example of command box together with ip address tracing.


How to share your folders with others??

1. First things 1st, right click at your target folder and select < Sharing and security..>
2. Then, click the second menu bar on the top <Sharing>
3. Next, tick ' Share this folder on the network'
3. Press < Apply> then, OK
4. Finish and DONE!!!! hehe..=)

" simple like 1, 2, 3 " hehe...=)

Then u can see ur target folder changed to the sharing icon or in other words a hands holding your folder..=)

OK, thats all for now..another new knowledge for me and for u as well..!
To be continue with more updates...=)


Monday, November 28, 2011

| how to test network strength |

Assalammualaikum....
Today i want to share a simple steps that everyone can do in order to test their network strength..
I'm sure that there must be a thousand people that know about it and don't forget too that, there must be even millions people out there that not even care about this..When the network signal is getting slow, they quickly get mad n start throwing their dirty words dekt pc yg lnsung xb'slh..no manners betoll kn...So if u are in this situation where the network is getting unstable, be patient and take this simple steps to test ur network strength.O.K!


The first steps is directly go to 'Start' button at desktop toolbar and look for 'Run' menu and press 'Enter'. Then you might see the 'Run' promp box will appear likes screenshot picture below. 
 After press 'Enter' the command window will appear.Since u want to test the network strengh, you can test through ping the google.com by typing this command 

ping google.com<space>-t
and then press the big 'ENTER'
hehe..=)
 result from our ping action will produce 2result either the signal is stable or not..If you can see

Reply from 209.85.195.99 bytes 32 line 171 ins bla..bla..bla.... that mens the signal is good n stable and you should scream yeyyyyyy ..! hehe.. 
but if u see 

'Request time out' on the black window that means the network is working slow n you hve to be patient and give the sad emoticon to ur twitter and facebook status... =(
 

Another new knowledge for me and you as well...to be continue with more updates...=)


| welcome note |

Bismillahirahmanirahim... 
Assalammualaikum..This must be my first post for my new blog..let's consider this blog as my another world of interest for now..Actually this blog is being created special for my network security class as trainer said to every trainee to have one. We should n have to create a blog sooner or later for a certain reasons...n yess, i will explain about it later..i hope so..Since i already have my personal blog, so i decide to have my second blog that are more professional and free from personal thingy..hehe..but i wish this blog can act more than that...i never want to put any limits to this blog which i can share everything that i think good to be spread out to entire worlds...
I think, this short opening hope is enough for now and let's give a BiGG applause to my new world..!!